<?xml version="1.0" encoding="utf-8"?><feed xmlns="http://www.w3.org/2005/Atom" ><generator uri="https://jekyllrb.com/" version="3.10.0">Jekyll</generator><link href="https://www.maxrodrigo.com/feed.xml" rel="self" type="application/atom+xml" /><link href="https://www.maxrodrigo.com/" rel="alternate" type="text/html" /><updated>2026-09-17T14:20:13+00:00</updated><id>https://www.maxrodrigo.com/feed.xml</id><title type="html">Max Rodrigo</title><subtitle>Technical executive and operator. Fractional CTO, engineering assessment, and enterprise AI adoption for growing companies. Based in Barcelona.</subtitle><author><name>Max Rodrigo</name><email>hi@maxrodrigo.com</email></author><entry><title type="html">E-Com-Con.com: Restoring the Lone Gunmen Website</title><link href="https://www.maxrodrigo.com/blog/e-com-con-restoration" rel="alternate" type="text/html" title="E-Com-Con.com: Restoring the Lone Gunmen Website" /><published>2026-09-04T00:00:00+00:00</published><updated>2026-09-04T00:00:00+00:00</updated><id>https://www.maxrodrigo.com/blog/e-com-con-restoration</id><content type="html" xml:base="https://www.maxrodrigo.com/blog/e-com-con-restoration"><![CDATA[<p><img src="/assets/images/ecomcon.gif" alt="The E-Com-Con Corp. wordmark" /></p>

<p>“It appears my client log-on isn’t working!
I’m in the airport waiting to board a plane and I really need to contact you folks…”</p>

<p>He was not alone.
Someone else wrote “I forgot my username and password. How can i retrieve them? Thanks”.
A public relations professional attached a real résumé,
carefully noting four and a half years as the media relations point person at Microsoft Canada.
A man named Tim asked where to send his child’s college fund,
around twenty-five thousand dollars,
if he wanted to invest all of it.
Another correspondent asked whether the company was traded on any North American stock exchange,
and if so, under what symbol.</p>

<p>All of them were writing to E-Com-Con Corp.,
a computer manufacturer whose flagship product was <a href="https://e-com-con.com/#products">a processor called the Octium IV</a>,
whose second product was a flying car,
and whose Chief Executive Officer was the Devil.</p>

<p>And E-Com-Con <a href="https://e-com-con.com/letters.htm">published their letters</a>.</p>

<h2 id="the-company-that-only-existed-on-television">The company that only existed on television</h2>

<p><a href="https://e-com-con.com/">e-com-con.com</a> was a prop.</p>

<p>Fox built it for the 2001 pilot of <em>The Lone Gunmen</em>, the <em>X-Files</em> spinoff that lasted only thirteen episodes.
They put it online months ahead of the broadcast.
The Wayback Machine’s first capture of the front page is dated 1 February 2001,
a month before the pilot aired,
and several of the letters wish the company a merry Christmas,
so it was already live and already collecting mail in December 2000.</p>

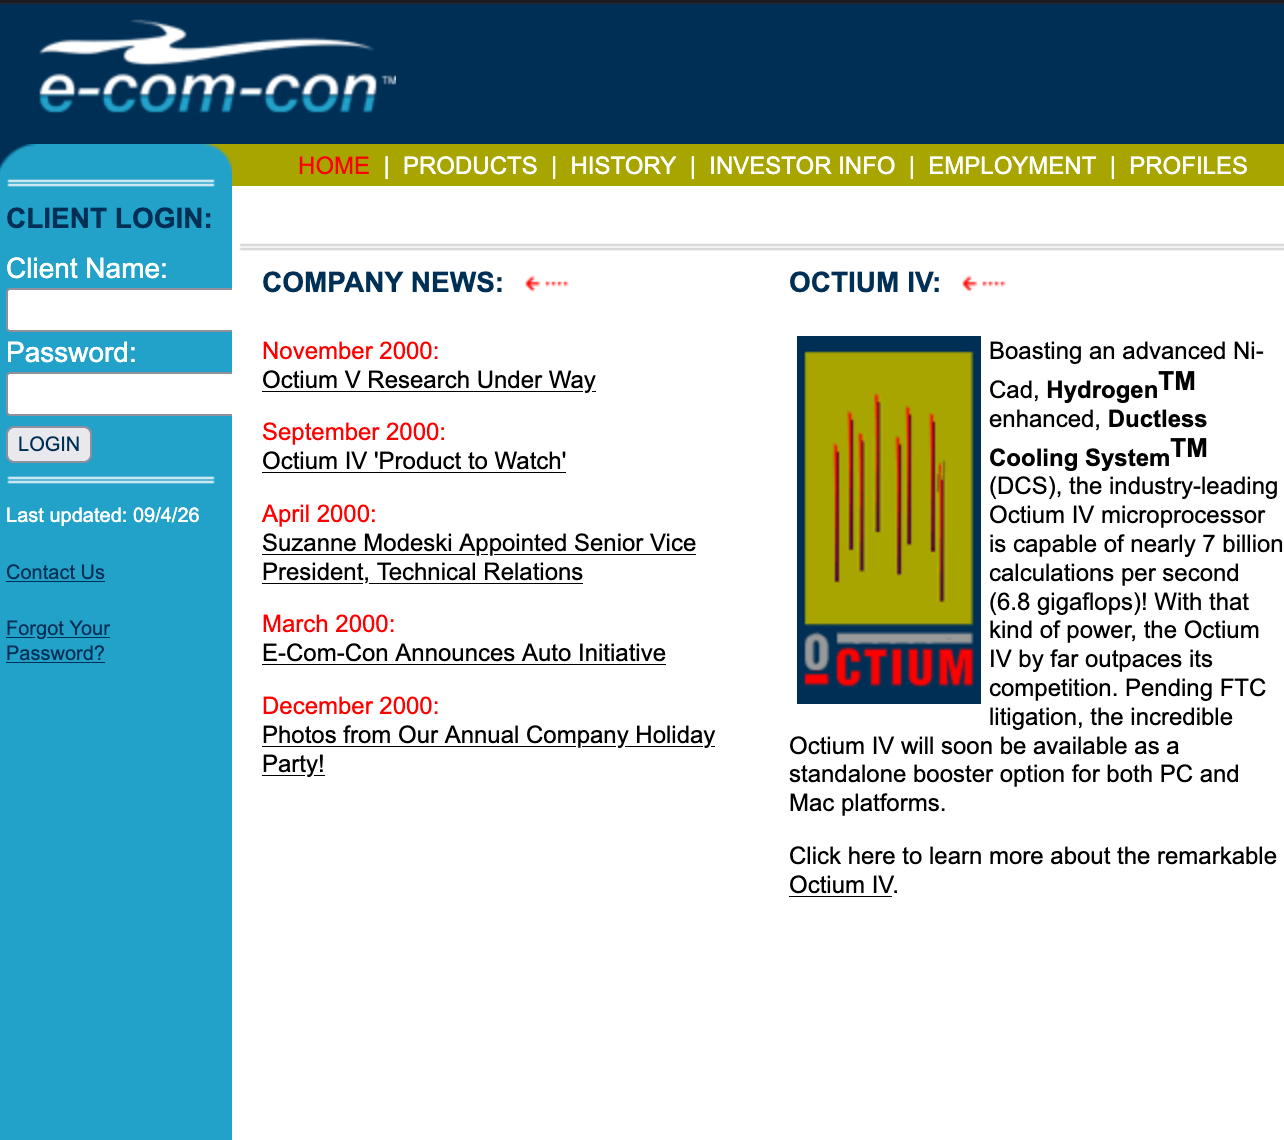
<p>It is built out of frames,
that’s how it was done back then.
A 70 pixel header strip across the top,
a 118 pixel sidebar next to a 527 pixel content pane,
because that is how wide a website was for 640x480 resolutions.
There is a teal CLIENT LOGIN box in the sidebar with a Client Name field, a Password field,
and a button that does nothing,
which is what the man in the airport was fighting with.
Underneath it sits a “Forgot Your Password?” link.
That, for some reason, loads the reader mail page.</p>

<h2 id="the-hack-shipped-in-the-html">The hack shipped in the HTML</h2>

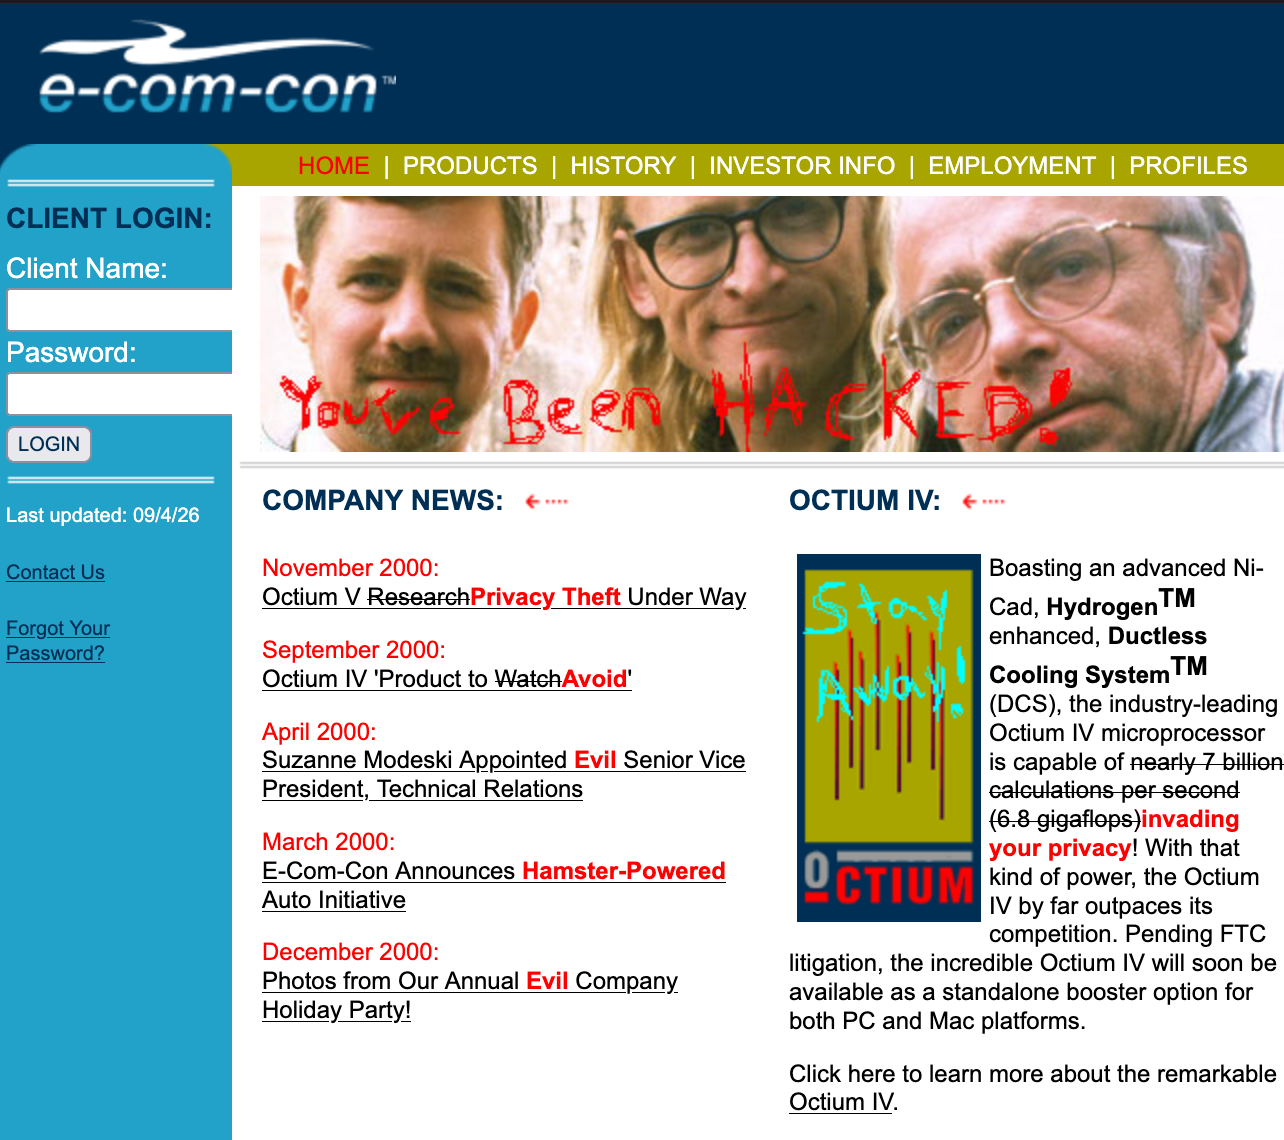
<p>The plot of the pilot turns on the Gunmen breaking into E-Com-Con and defacing its website,
and the production solved that the cheapest and most romantic way available in 2001,
by marking the defacement up inline in the files that were already there.
The corporate line goes in <del><code class="language-plaintext highlighter-rouge">&lt;strike&gt;</code></del>,
the truth goes next to it in a red <code class="language-plaintext highlighter-rouge">&lt;font color&gt;</code>,
and both versions sit on screen at the same time, permanently.</p>

<p>The <a href="https://e-com-con.com/#profiles">executive roster</a> is the best of it.
Chairman and CEO becomes The Devil.
Chief Financial Officer becomes Lead Embezzler.
Senior Vice President, Technical Relations becomes Pendrell’s Plaything.
VP of Operations, Middle East Sector becomes Terrorist.
And the Chief Engineer, in a caption under a photo from the company holiday party,
becomes Bad dancer.</p>

<p>The investor relations section got the same treatment and it is sharper than it has any right to be.
On the <a href="https://e-com-con.com/inv_balance2000.htm">consolidated balance sheet</a>, “Gas holdings” is struck out and replaced with “Stolen Credit Cards”,
and “Current construction” with “Mind-Control Research”.
The outlook page opens with the standard forward-looking-statements boilerplate,
“The following statements are based on current expectations”,
where “based on current expectations” is crossed out and replaced with “LIES!”.
Then comes the risk factors paragraph,
two hundred words of real SEC filing language about downward cycles and inventory obsolescence and micron process transitions,
and the Gunmen annotate the entire thing with a single word.</p>

<p>Gibberish!</p>

<p>Glorious.</p>

<p>On the restored site both layers are still there, and a button switches between them.
None of the wording is mine.
The toggle is the only new thing.</p>

<p><img src="/assets/images/e-com-con.com.png" alt="E-Com-Con Corp. Website" />
<img src="/assets/images/e-com-con.com-hacked.png" alt="E-Com-Con Corp. Website, hacked" /></p>

<h2 id="the-jokes-that-almost-got-lost">The jokes that almost got lost</h2>

<p>Two of these I would have missed entirely if the readers of 2001 had not found them first.
The VP of Operations for the Middle East Sector is named Gizli Dosyalar.
That is Turkish for “Secret Files”.
It is the title <em>The X-Files</em> runs under in Turkey.</p>

<p>The balance sheet, after several screens of invented numbers,
totals liabilities and stockholders’ equity at $10,130.
Ten thirteen. <a href="https://en.wikipedia.org/wiki/Ten_Thirteen_Productions">Chris Carter’s production company</a>.</p>

<p>A woman writing in from Spain spotted both, twenty-five years ago,
in an email that runs down half the page listing every character name she recognised,
Betty Templeton and Chrissy Giorgio and Dr. Zama Ishimaru and Modeski and Pendrell,
noting that Suzanne Modeski’s biography has her working as a news anchor at KHOU in Houston,
the local Fox affiliate.
She signs off “Well Merry Christmas and Trust no one.”</p>

<p>Three separate people wrote in about <em>Seven Days in May</em>.
One of them just asked, without preamble, “Is Burt Lancaster on staff?”</p>

<p>The best of the letters are the ones written in character.
An Assistant Director named Kersh requests specifications on the ductless cooling systems,
and adds that should any correspondence arrive from one F. Mulder,
it should be forwarded on, where this does not violate federal privacy laws.
A job application arrives signed Lee Harvey.
Another, from Dana Sculder.
Someone asks to be added to the company newsletter and signs it Scott.
One reader, having worked the whole thing out,
suggested that the company “should post correspondences with people who think it’s a real company somewhere so we can all laugh at them.”</p>

<p>Apparently Fox took the note.
The internet was beautiful back then.</p>

<h2 id="what-i-rebuilt">What I rebuilt</h2>

<p>The restoration is a literal copy.
Every <code class="language-plaintext highlighter-rouge">.htm</code> file is close to byte for byte what actually shipped,
pulled from the February to August 2001 captures and cross-checked against a later mirror,
with the original stylesheet unmodified and new rules appended at the bottom for the toggle.</p>

<p>The rule I set was that nothing gets invented.</p>

<p>Websites were handcrafted.
Developers listened to users, mostly because the volume was low enough that they could.
I think we are slowly losing that as AI works its way into the internet.</p>

<p>Four of the nav bars had to be reconstructed,
because those four pages were never crawled and the nav bar is generated per page.
Each one is the exact table and script pattern copied from the two that did survive,
with a different item marked active.
And one more thing.
The Octium IV product graphic survived only with the defacement already on it,
so the toggle had nothing to switch back to.
I painted the graffiti out by hand.
That image is the one thing on the restored site that never existed.</p>

<h2 id="whats-been-lost">What’s been lost</h2>

<p>Four of the five executive headshots are gone.
Only Suzanne Modeski’s survived.</p>

<p>Gone too are the product photos, the header background tile,
Pendrell’s signature graphic and his large photograph on the History page,
the team photo, both divider graphics,
four of the five holiday party photos,
and two of the party pages entirely, captions and all, because those were never crawled either.</p>

<p>They are all still on the restored site, as broken image tags pointing at the original filenames.
That is what survived, so that is what is there.</p>

<p>If you have any of it,
a magazine scan, a copy from somewhere the crawlers did not reach,
I would genuinely love to see it.</p>

<p><img src="/assets/images/e-com-con-wayback-calendar.png" alt="Wayback Machine capture calendar for e-com-con.com" /></p>

<h2 id="you-can-read-the-ending-off-the-server-header">You can read the ending off the Server header</h2>

<p>The site stayed up, untouched, for two and a half years after the show was cancelled.
The front page was crawled thirty-four times between February 2001 and 26 October 2003,
always the same site, nobody maintaining it, the registration quietly renewed on somebody’s budget line.</p>

<p>Then it stops.</p>

<p>On 11 February 2004 the domain answers with a 301 for the first time.
Six weeks later a capture of the redirect carries this:</p>

<div class="language-plaintext highlighter-rouge"><div class="highlight"><pre class="highlight"><code>Server: Apache/1.3.29 (Unix) mod_pointer/0.8 PHP/4.3.2
X-Redirected-By: mod_pointer - http://stderr.net/mod_pointer/
Location: http://mi-solutions.rite2u.com/
</code></pre></div></div>

<p><code class="language-plaintext highlighter-rouge">mod_pointer</code> is a domain parking module.
Its whole job is to sit on an expired domain and bounce whoever still shows up to a reseller.
The header even links to its own homepage, which is the most 2004 detail in the entire investigation.
Fox stopped paying the renewal.
For a website about a conspiracy, that is a spectacularly boring cause of death.</p>

<p>After that you can watch the domain change hands without reading a single page,
because each new owner brings a different stack.
By February 2006 it is still <code class="language-plaintext highlighter-rouge">mod_pointer</code>, now serving a parking page instead of a redirect.
By May 2008 it answers as <code class="language-plaintext highlighter-rouge">Microsoft-IIS/6.0</code> with <code class="language-plaintext highlighter-rouge">X-Powered-By: ASP.NET</code>.
By June 2013 it is <code class="language-plaintext highlighter-rouge">Apache/2.0.51 (Fedora)</code> running PHP 5.2.9,
and the pages it is serving are a conspiracy blog,
mining the phrase “lone gunman” for search traffic.</p>

<p>There is one more thing in the record I cannot explain.
The domain without the hyphen, e-comcon.com, started serving real mirrored copies of the original pages around 2008.
Someone unrelated to Fox re-hosted the archived HTML and left it up.
It is the closest thing to a predecessor this project has,
and I have no idea who did it.</p>

<h2 id="the-letters">The letters</h2>

<p>The reader who suggested Fox publish the confused correspondence
was writing to a prop with a three-month shelf life,
and got a permanent page out of it.</p>

<p>That page is the reason any of this was worth rebuilding.
Everything else on the site is a production designer’s joke about processors and flying cars,
and a very good one.
But the letters have something special.
The only place where actual strangers walked in and interacted with it.
A small place, on a small internet.</p>

<p><a href="https://e-com-con.com/">The site is back up</a>, mail page included, broken images and all. Enjoy.</p>

<p>“Well Merry Christmas and Trust no one.”</p>]]></content><author><name>Max Rodrigo</name><email>hi@maxrodrigo.com</email></author><category term="thoughts" /><category term="web" /><category term="writing" /><summary type="html"><![CDATA[In 2001 Fox built a website for a fictional computer company, and real people emailed it asking for jobs. I rebuilt it from Wayback Machine captures.]]></summary><media:thumbnail xmlns:media="http://search.yahoo.com/mrss/" url="https://www.maxrodrigo.com/assets/images/e-com-con.com-hacked.png" /><media:content medium="image" url="https://www.maxrodrigo.com/assets/images/e-com-con.com-hacked.png" xmlns:media="http://search.yahoo.com/mrss/" /></entry><entry><title type="html">How to Install Alpine Linux on Raspberry Pi</title><link href="https://www.maxrodrigo.com/blog/how-to-install-alpine-on-raspberry-pi" rel="alternate" type="text/html" title="How to Install Alpine Linux on Raspberry Pi" /><published>2021-10-05T00:00:00+00:00</published><updated>2021-10-05T00:00:00+00:00</updated><id>https://www.maxrodrigo.com/blog/how-to-install-alpine-on-raspberry-pi</id><content type="html" xml:base="https://www.maxrodrigo.com/blog/how-to-install-alpine-on-raspberry-pi"><![CDATA[<p>Alpine Linux is a lightweight, security-oriented distribution,
a good fit for Raspberry Pi servers:
minimal resource usage, a small attack surface, and fast boot times.
This guide covers a full persistent (sys-mode) installation.</p>

<h2 id="preparation">Preparation</h2>

<ol>
  <li>
    <p><a href="https://alpinelinux.org/downloads/">Download</a> the Raspberry Pi build.</p>

    <p><strong>Which version should I install?</strong></p>

    <p><strong>TL;DR: Unless you are using Raspberry Pi 2 Model B or Raspberry Pi Zero, install</strong> <code class="language-plaintext highlighter-rouge">aarch64</code>.</p>

    <p>There are currently three versions of Alpine for Raspberry Pi: <code class="language-plaintext highlighter-rouge">armhf</code>, <code class="language-plaintext highlighter-rouge">armv7</code>, and <code class="language-plaintext highlighter-rouge">aarch64</code>.</p>

    <p>You should be safe using the <code class="language-plaintext highlighter-rouge">armhf</code> build on all versions including Pi Zero and Compute Modules,
 but it may perform less optimally on recent versions of Raspberry Pi.</p>

    <p>The <code class="language-plaintext highlighter-rouge">armv7</code> build is compatible with the Raspberry Pi 2 Model B.
 The <code class="language-plaintext highlighter-rouge">aarch64</code> build should be compatible with Raspberry Pi 2 Model v1.2,
 Raspberry Pi 3 and Compute Module 3,
 and Raspberry Pi 4 Model B.</p>
  </li>
  <li>
    <p>Identify <strong>your</strong> memory card name: <code class="language-plaintext highlighter-rouge">lsblk</code>.</p>

    <div class="language-sh highlighter-rouge"><div class="highlight"><pre class="highlight"><code> <span class="nv">$ </span>lsblk
 NAME        MAJ:MIN RM   SIZE RO TYPE MOUNTPOINT
 mmcblk0     179:0    0  59.5G  0 disk
 ├─mmcblk0p1 179:1    0   174K  0 part
 ├─mmcblk0p2 179:2    0   1.4M  0 part
 └─mmcblk0p3 179:3    0 130.7M  0 part
</code></pre></div>    </div>
  </li>
  <li>
    <p>Partition and format the memory card.</p>

    <p>Install <a href="https://www.gnu.org/software/parted/">GNU Parted</a> (<code class="language-plaintext highlighter-rouge">parted</code>)
 and <a href="https://linux.die.net/man/8/mkfs.vfat">mkfs.vfat</a> (<code class="language-plaintext highlighter-rouge">dosfstools</code>) if not available.</p>

    <p>Create a small partition for <code class="language-plaintext highlighter-rouge">/boot</code>, then allocate the rest of the disk to a separate partition.</p>

    <div class="language-sh highlighter-rouge"><div class="highlight"><pre class="highlight"><code> <span class="nb">sudo </span>parted /dev/mmcblk0 <span class="nt">--script</span> <span class="nt">--</span> mklabel msdos
 <span class="nb">sudo </span>parted /dev/mmcblk0 <span class="nt">--script</span> <span class="nt">--</span> mkpart primary fat32 1 256M
 <span class="nb">sudo </span>parted /dev/mmcblk0 <span class="nt">--script</span> <span class="nt">--</span> mkpart primary ext4 256M 100%
</code></pre></div>    </div>

    <p>Set the boot partition <a href="https://www.gnu.org/software/parted/manual/html_node/set.html">flags</a> and format.</p>

    <div class="language-sh highlighter-rouge"><div class="highlight"><pre class="highlight"><code> <span class="nb">sudo </span>parted /dev/mmcblk0 <span class="nt">--script</span> <span class="nt">--</span> <span class="nb">set </span>1 boot on
 <span class="nb">sudo </span>parted /dev/mmcblk0 <span class="nt">--script</span> <span class="nt">--</span> <span class="nb">set </span>1 lba on

 <span class="nb">sudo </span>mkfs.fat <span class="nt">-F32</span> <span class="nt">-I</span> /dev/mmcblk0p1
 <span class="nb">sudo </span>mkfs.ext4 /dev/mmcblk0p2
</code></pre></div>    </div>

    <p>You can verify by printing the partition table.</p>

    <div class="language-sh highlighter-rouge"><div class="highlight"><pre class="highlight"><code> <span class="nb">sudo </span>parted /dev/mmcblk0 <span class="nt">--script</span> print
</code></pre></div>    </div>
  </li>
  <li>
    <p>Mount the boot partition.</p>

    <div class="language-sh highlighter-rouge"><div class="highlight"><pre class="highlight"><code> <span class="nb">sudo </span>mount /dev/mmcblk0p1 /mnt/sd
</code></pre></div>    </div>
  </li>
  <li>
    <p>Unpack the Alpine package onto the partition.</p>

    <div class="language-sh highlighter-rouge"><div class="highlight"><pre class="highlight"><code> <span class="nb">sudo tar </span>xf alpine-rpi-<span class="k">**</span>.tar.gz <span class="nt">-C</span> /mnt/sd <span class="nt">--no-same-owner</span>
</code></pre></div>    </div>
  </li>
  <li>
    <p>Create the <code class="language-plaintext highlighter-rouge">usercfg.txt</code> file in the boot partition: <code class="language-plaintext highlighter-rouge">/mnt/sd/usercfg.txt</code>.</p>

    <pre><code class="language-txt"> # Enable mini UART as serial port (/dev/ttyS0).
 # Also, fixes VideoCore IV (aka the GPU or the VPU) frequency to 250MHz.
 enable_uart=1

 # give the GPU the least amount of RAM it can get by with (16MB).
 # This also triggers the Pi to use a cutdown version of the firmware (start_cd.elf).
 gpu_mem=16

 # Optionally turn off audio and bluetooth.  (Note "dt" stands for device tree)
 dtparam=audio=off,pi3-disable-bt
</code></pre>
  </li>
  <li>
    <p>Headless Installation (<em>optional</em>)</p>

    <p>If you don’t have direct access to your system,
 such as via a display and keyboard
 you can install Alpine with the overlay directory structure and <a href="https://github.com/davidmytton/alpine-linux-headless-raspberrypi">headless script</a>.</p>

    <div class="language-sh highlighter-rouge"><div class="highlight"><pre class="highlight"><code> <span class="nb">sudo </span>curl <span class="nt">-L</span> <span class="nt">-o</span> /mnt/sd/headless.apkovl.tar.gz https://github.com/davidmytton/alpine-linux-headless-raspberrypi/releases/download/2021.06.23/headless.apkovl.tar.gz
</code></pre></div>    </div>
  </li>
  <li>
    <p>Wifi Configuration (<em>optional</em>)</p>

    <p>With the headless script installed, create the <code class="language-plaintext highlighter-rouge">wifi.txt</code> file in the boot partition: <code class="language-plaintext highlighter-rouge">/mnt/sd/wifi.txt</code>.</p>

    <pre><code class="language-txt"> ssid password
</code></pre>
  </li>
  <li>
    <p>Copy an answer file (<em>optional</em>).</p>

    <p>During the setup process
 an <em><a href="https://docs.alpinelinux.org/user-handbook/0.1a/Installing/setup_alpine.html#_answer_files">answer file</a></em> can be provided
 to automate the configuration process.</p>
  </li>
  <li>
    <p>Unmount.</p>
    <div class="language-sh highlighter-rouge"><div class="highlight"><pre class="highlight"><code> <span class="nb">sudo </span>umount /mnt/sd
</code></pre></div>    </div>
  </li>
</ol>

<h2 id="installation">Installation</h2>

<ol>
  <li>
    <p>Log in to Alpine with the default username and password.
If you have a headless installation you can ssh into the Raspberry Pi.</p>

    <p>Default Alpine login credentials are username <code class="language-plaintext highlighter-rouge">root</code> with <strong>empty password</strong>.</p>
  </li>
  <li>
    <p>Run setup.</p>

    <div class="language-sh highlighter-rouge"><div class="highlight"><pre class="highlight"><code> setup-alpine
</code></pre></div>    </div>

    <p>Alternatively to the interactive mode,
 an answer file can be provided during the preparation to automate the configuration process.</p>

    <div class="language-sh highlighter-rouge"><div class="highlight"><pre class="highlight"><code> setup-alpine <span class="nt">-f</span> /media/mmcblk0p1/alpine-setup.txt
</code></pre></div>    </div>
  </li>
  <li>
    <p>Format the system partition.</p>

    <p>Both partitions already exist from <a href="#preparation">preparation</a>.
 The second one is where Alpine gets installed,
 so format it from the running system and mount it.</p>

    <div class="language-sh highlighter-rouge"><div class="highlight"><pre class="highlight"><code> apk add e2fsprogs
 mkfs.ext4 /dev/mmcblk0p2
 mount /dev/mmcblk0p2 /mnt
</code></pre></div>    </div>
  </li>
  <li>
    <p>Install the system files.</p>

    <div class="language-sh highlighter-rouge"><div class="highlight"><pre class="highlight"><code> setup-disk <span class="nt">-m</span> sys /mnt
</code></pre></div>    </div>
    <p>If you get <code class="language-plaintext highlighter-rouge">ext4 is not supported . Only supported are: vfat</code> error,
 run with <code class="language-plaintext highlighter-rouge">FORCE_BOOTFS</code> set.</p>

    <div class="language-sh highlighter-rouge"><div class="highlight"><pre class="highlight"><code> <span class="nv">FORCE_BOOTFS</span><span class="o">=</span>1 setup-disk <span class="nt">-m</span> sys /mnt
</code></pre></div>    </div>
  </li>
</ol>

<h3 id="boot-partition-cleanup">Boot partition cleanup</h3>

<ol>
  <li>
    <p>Remount old partition in RW.
An update in the first partition is required for the next reboot.</p>

    <div class="language-sh highlighter-rouge"><div class="highlight"><pre class="highlight"><code> mount <span class="nt">-o</span> remount,rw /media/mmcblk0p1
</code></pre></div>    </div>
  </li>
  <li>
    <p>Clean up the boot folder in the first partition to drop unused files.</p>

    <div class="language-sh highlighter-rouge"><div class="highlight"><pre class="highlight"><code> <span class="nb">rm</span> <span class="nt">-f</span> /media/mmcblk0p1/boot/<span class="k">*</span>
 <span class="nb">cd</span> /mnt
 <span class="nb">rm </span>boot/boot
</code></pre></div>    </div>
  </li>
  <li>
    <p>Move the image and <code class="language-plaintext highlighter-rouge">init ram</code> for Alpine Linux into the right place.</p>

    <div class="language-sh highlighter-rouge"><div class="highlight"><pre class="highlight"><code> <span class="nb">mv </span>boot/<span class="k">*</span> /media/mmcblk0p1/boot
 <span class="nb">rm</span> <span class="nt">-Rf</span> boot
 <span class="nb">mkdir </span>media/mmcblk0p1 <span class="c"># It's the mount point for the first partition on the next reboot</span>
</code></pre></div>    </div>
  </li>
</ol>

<h3 id="filesystem-configuration">Filesystem configuration</h3>

<ol>
  <li>
    <p>Update <code class="language-plaintext highlighter-rouge">/etc/fstab</code>:</p>

    <div class="language-sh highlighter-rouge"><div class="highlight"><pre class="highlight"><code> <span class="nb">echo</span> <span class="s2">"/dev/mmcblk0p1 /media/mmcblk0p1 vfat defaults 0 0"</span> <span class="o">&gt;&gt;</span> etc/fstab
 <span class="nb">sed</span> <span class="nt">-i</span> <span class="s1">'/cdrom/d'</span> etc/fstab
 <span class="nb">sed</span> <span class="nt">-i</span> <span class="s1">'/floppy/d'</span> etc/fstab
</code></pre></div>    </div>
  </li>
  <li>
    <p>Enable edge repository.</p>

    <div class="language-sh highlighter-rouge"><div class="highlight"><pre class="highlight"><code>  <span class="nb">sed</span> <span class="nt">-i</span> <span class="s1">'/edge/s/^#//'</span> /mnt/etc/apk/repositories
</code></pre></div>    </div>
  </li>
  <li>
    <p>For the next boot,
indicate that the root filesystem is on the second partition.
If the cmdline.txt file contains a line that starts with /root, then use sed:</p>

    <div class="language-sh highlighter-rouge"><div class="highlight"><pre class="highlight"><code> <span class="nb">sed</span> <span class="nt">-i</span> <span class="s1">'s/$/ root=\/dev\/mmcblk0p2 /'</span> /media/mmcblk0p1/cmdline.txt
</code></pre></div>    </div>
  </li>
  <li>
    <p>Make sure that appropriate <code class="language-plaintext highlighter-rouge">cgroups</code> are enabled</p>

    <div class="language-sh highlighter-rouge"><div class="highlight"><pre class="highlight"><code> <span class="nb">sed</span> <span class="nt">-i</span> <span class="s2">"s/</span><span class="nv">$/</span><span class="s2"> cgroup_enable=cpuset cgroup_enable=memory cgroup_memory=1/"</span> /media/mmcblk0p1/cmdline.txt
</code></pre></div>    </div>
  </li>
  <li>
    <p>Reboot</p>
  </li>
</ol>

<h2 id="post-install-tweaks">Post-install tweaks</h2>

<h3 id="chrony-time-sync">Chrony time sync</h3>

<p>If using <code class="language-plaintext highlighter-rouge">chrony</code>,
allow the system clock to be stepped in the first three updates
if its offset is larger than 1 second.
This is common on Raspberry Pi where there is no hardware clock.</p>

<div class="language-sh highlighter-rouge"><div class="highlight"><pre class="highlight"><code><span class="nb">echo</span> <span class="s2">"makestep 1.0 3"</span> <span class="o">&gt;&gt;</span> /etc/chrony/chrony.conf
</code></pre></div></div>]]></content><author><name>Max Rodrigo</name><email>hi@maxrodrigo.com</email></author><category term="howto" /><category term="linux" /><category term="raspberry-pi" /><summary type="html"><![CDATA[Step-by-step guide to partitioning an SD card, writing Alpine Linux, configuring headless WiFi, and setting up persistent sys-mode on a Raspberry Pi.]]></summary></entry><entry><title type="html">Semantic Line Breaks</title><link href="https://www.maxrodrigo.com/blog/semantic-line-breaks" rel="alternate" type="text/html" title="Semantic Line Breaks" /><published>2020-11-15T00:00:00+00:00</published><updated>2020-11-15T00:00:00+00:00</updated><id>https://www.maxrodrigo.com/blog/semantic-line-breaks</id><content type="html" xml:base="https://www.maxrodrigo.com/blog/semantic-line-breaks"><![CDATA[<p>I’ve been writing text files for a living for over a decade now.
Code, documentation, READMEs, commit messages, config files, blog posts,
and the list goes on; all plain text, all version controlled.
And for most of that time I treated prose and code as fundamentally different things.</p>

<p>Code got careful formatting.
Every indentation had meaning, every line break was intentional.
I’d refactor a function to make its structure clearer
before I’d ever think about adding a comment.
<em>“the code is the comment”</em>!</p>

<p>Then I’d open a Markdown file and just… type.
Long unbroken lines that wrapped wherever the terminal decided.
Or worse, hard-wrapped at 80 columns like Fortran punch cards.
Either way, the moment I needed to revise something,
version control made it look like I’d rewritten the entire paragraph.</p>

<p>At some point I started putting each sentence on its own line.
<em>Mostly because vimdiff vertical split</em>.
Then I started breaking the text with intention.
It felt weird at first, like writing poetry (maybe because I don’t write poetry).
But the diffs got cleaner. The edits got easier. And I never went back.</p>

<p>Turns out the habit is neither new nor mine.
It has a name, a specification,
and it’s been standard advice since the 1970s.</p>

<h2 id="the-diff-problem">The diff problem</h2>

<p>Here’s what a typical diff looks like when you change one word
in a paragraph that’s hard-wrapped at 80 columns:</p>

<div class="language-diff highlighter-rouge"><div class="highlight"><pre class="highlight"><code><span class="gd">-The beauteous scheme is that now, if you change
-your mind about what a paragraph should look
-like, you can change the formatted output merely
-by changing the definition of ''.PP'' and
-re-running the formatter.
</span><span class="gi">+The beauty of this scheme is that now, if you
+change your mind about what a paragraph should
+look like, you can change the formatted output
+merely by changing the definition of ''.PP''
+and re-running the formatter.
</span></code></pre></div></div>

<p>Every line is marked as changed.
A reviewer has to read the entire block to figure out what was actually changed.
Was it a rewrite? A word swap? A typo?
Impossible to tell at a glance.</p>

<p>Now the same paragraph, with each clause on its own line:</p>

<div class="language-diff highlighter-rouge"><div class="highlight"><pre class="highlight"><code><span class="gd">-The beauteous scheme is that now,
</span><span class="gi">+The beauty of this scheme is that now,
</span> if you change your mind
 about what a paragraph should look like,
 you can change the formatted output
 merely by changing
 the definition of ''.PP''
 and re-running the formatter.
</code></pre></div></div>

<p>One word changed, one line in the diff.
The signal-to-noise ratio goes from terrible to “ok, I’ll review it”.</p>

<h2 id="kernighan-said-it-first">Kernighan said it first</h2>

<p>In 1974, Brian Kernighan wrote a Bell Labs memo titled “UNIX for Beginners.”
In it, he offered this advice:</p>

<blockquote>
  <p>Most documents go through several versions (always more than you expected)
before they are finally finished.
Accordingly, you should do whatever possible to make the job of changing them easy.</p>

  <p>Start each sentence on a new line.
Make lines short, and break lines at natural places,
such as after commas and semicolons, rather than randomly.
Since most people change documents by rewriting phrases
and adding, deleting and rearranging sentences,
these precautions simplify any editing you have to do later.</p>
</blockquote>

<p>This was written for people using <code class="language-plaintext highlighter-rouge">ed</code> and troff on terminals
that probably couldn’t display more than 24 lines at a time.
And yet it applies perfectly, <em>maybe even more</em> to a world
where we review prose in pull requests
and collaborate on documentation asynchronously.</p>

<p>Kernighan hit the nail on the head:
<strong>text that will be revised should be structured for revision, not for reading.</strong>
The rendered output is for readers. The source is for writers.</p>

<h2 id="the-rules">The rules</h2>

<p>The <a href="https://sembr.org/">SemBr specification</a> formalizes this into a clean set of conventions:</p>

<ol>
  <li>A line break <strong>must</strong> occur after a sentence (<code class="language-plaintext highlighter-rouge">.</code>, <code class="language-plaintext highlighter-rouge">!</code>, <code class="language-plaintext highlighter-rouge">?</code>).</li>
  <li>A line break <strong>should</strong> occur after an independent clause (<code class="language-plaintext highlighter-rouge">,</code>, <code class="language-plaintext highlighter-rouge">;</code>, <code class="language-plaintext highlighter-rouge">:</code>, <code class="language-plaintext highlighter-rouge">—</code>).</li>
  <li>A line break <strong>may</strong> occur after a dependent clause to clarify structure or stay under 80 characters.</li>
  <li>A line break <strong>must not</strong> occur within a hyphenated word.</li>
  <li>A line break <strong>must not</strong> alter the rendered output.</li>
</ol>

<p>The key insight is rule 5.
In Markdown, reStructuredText, AsciiDoc, LaTeX, and Org Mode,
consecutive lines within the same block are joined into a single paragraph.
Line breaks are invisible to the reader.
They exist only to serve the writer.</p>

<h2 id="compatible-formats">Compatible formats</h2>

<p>Semantic line breaks work in any markup language
where consecutive lines are joined into a single paragraph:</p>

<ul>
  <li>Markdown / CommonMark</li>
  <li>reStructuredText</li>
  <li>AsciiDoc</li>
  <li>LaTeX</li>
  <li>Org Mode</li>
  <li>MediaWiki</li>
</ul>

<p>If you write HTML or plain text where newlines are significant,
this doesn’t apply.</p>

<h2 id="in-practice">In practice</h2>

<p>You don’t need to reformat an entire repository.
Just start using semantic breaks in new text and revisions.
Over time the style propagates naturally,
and the distinctive shape of semantically-broken text
makes it obvious which sections have been touched recently.</p>

<p>For reviewing diffs, <code class="language-plaintext highlighter-rouge">git diff --word-diff</code> works well with this approach,
highlighting exactly which words changed within a line.</p>

<div class="language-plaintext highlighter-rouge"><div class="highlight"><pre class="highlight"><code>Read the text out loud.
Where you pause for breath, for emphasis,
to let the idea land before the next one starts.
That's where the line break goes.
</code></pre></div></div>

<p>It’s one of those small things that costs nothing
and quietly makes everything around it better.</p>]]></content><author><name>Max Rodrigo</name><email>hi@maxrodrigo.com</email></author><category term="thoughts" /><category term="writing" /><category term="git" /><summary type="html"><![CDATA[Write prose in markup languages with one sentence per line and breaks at clause boundaries for cleaner diffs and easier editing.]]></summary></entry><entry><title type="html">Escaping strings in Bash</title><link href="https://www.maxrodrigo.com/blog/escaping-strings-in-bash" rel="alternate" type="text/html" title="Escaping strings in Bash" /><published>2020-10-06T00:00:00+00:00</published><updated>2020-10-06T00:00:00+00:00</updated><id>https://www.maxrodrigo.com/blog/escaping-strings-in-bash</id><content type="html" xml:base="https://www.maxrodrigo.com/blog/escaping-strings-in-bash"><![CDATA[<p>A couple of days ago,
an interesting thread came up on HN about <a href="https://news.ycombinator.com/item?id=24659282">escaping strings in Bash using !:q</a>.</p>

<p>As <a href="https://twitter.com/phphys/status/1311727268398465029">Pascal Hirsch</a> describes on Twitter,
the idea is simple: after an expression, use <code class="language-plaintext highlighter-rouge">!:q</code> to escape the given string.
Useful when you need to pass a complex string as a single quoted argument,
or when constructing safe inputs for commands like <code class="language-plaintext highlighter-rouge">xargs</code>, <code class="language-plaintext highlighter-rouge">ssh</code>, or <code class="language-plaintext highlighter-rouge">eval</code>.</p>

<div class="language-bash highlighter-rouge"><div class="highlight"><pre class="highlight"><code><span class="nv">$ </span><span class="c"># This string 'has single' "and double" quotes and a $</span>
<span class="nv">$ </span><span class="o">!</span>:q
<span class="s1">'# This string '</span><span class="se">\'</span><span class="s1">'has single'</span><span class="se">\'</span><span class="s1">' "and double" quotes and a $'</span>
bash: <span class="c"># This string 'has single' "and double" quotes and a $: command not found</span>
</code></pre></div></div>

<h3 id="how-does-this-work">How does this work?</h3>

<p>It starts with the history expansion character <code class="language-plaintext highlighter-rouge">!</code>
(<code class="language-plaintext highlighter-rouge">!cmd</code> expands to the last <code class="language-plaintext highlighter-rouge">cmd</code> executed)
followed by the quote modifier (<code class="language-plaintext highlighter-rouge">:q</code>).
A clever use of <a href="https://www.gnu.org/software/bash/manual/html_node/History-Interaction.html#History-Interaction">history expansion</a> and <a href="https://www.gnu.org/software/bash/manual/html_node/Modifiers.html">modifiers</a>.</p>

<h3 id="print-without-executing">Print without executing</h3>

<p>The <code class="language-plaintext highlighter-rouge">p</code> modifier will print the command without execution,
avoiding the <code class="language-plaintext highlighter-rouge">command not found</code> error.</p>

<div class="language-bash highlighter-rouge"><div class="highlight"><pre class="highlight"><code><span class="nv">$ </span><span class="o">!</span>:q:p
<span class="s1">'# This string '</span><span class="se">\'</span><span class="s1">'has single'</span><span class="se">\'</span><span class="s1">' "and double" quotes and a $'</span>
</code></pre></div></div>]]></content><author><name>Max Rodrigo</name><email>hi@maxrodrigo.com</email></author><category term="howto" /><category term="shell" /><summary type="html"><![CDATA[Use Bash history expansion (!:q and !:q:p) to safely escape arbitrary strings containing single quotes, double quotes, and special characters.]]></summary></entry><entry><title type="html">uz: A Zsh Micro Manager You Won’t Hate</title><link href="https://www.maxrodrigo.com/blog/uz-micro-zsh-plugin-manager" rel="alternate" type="text/html" title="uz: A Zsh Micro Manager You Won’t Hate" /><published>2020-07-19T00:00:00+00:00</published><updated>2020-07-19T00:00:00+00:00</updated><id>https://www.maxrodrigo.com/blog/uz-micro-zsh-plugin-manager</id><content type="html" xml:base="https://www.maxrodrigo.com/blog/uz-micro-zsh-plugin-manager"><![CDATA[<pre><code class="language-txt"> /$$   /$$ /$$$$$$$$
| $$  | $$|____ /$$/
| $$  | $$   /$$$$/
| $$  | $$  /$$__/
| $$$$$$$/ /$$$$$$$$
| $$____/ |________/
| $$
| $$
 \_$
</code></pre>

<p>There’s something about the UNIX philosophy that gets lost
when tools, whether for UX or GitHub stars,
try to do too much.</p>

<p>Although I’m not big on ricing,
my dotfiles have been with me for more than a decade now and managing them matters.
For zsh plugin managers there are options:
<a href="https://ohmyz.sh/">oh-my-zsh</a>, <a href="https://github.com/zsh-users/antigen">antigen</a>, or <a href="https://github.com/getantibody/antibody">antibody</a>.
Each solved something but added its own overhead.</p>

<p>What I needed was simple:
clone plugins from GitHub,
source them,
and occasionally update or clean up unused ones.</p>

<p><a href="https://github.com/maxrodrigo/uz">uz</a>: a micro manager you won’t hate. Under 40 lines.</p>

<p>Contributions and feedback are welcome on <a href="https://github.com/maxrodrigo/uz">GitHub</a>.</p>

<h2 id="installation">Installation</h2>

<div class="language-sh highlighter-rouge"><div class="highlight"><pre class="highlight"><code>git clone https://github.com/maxrodrigo/uz.git ~/.uz
</code></pre></div></div>

<div class="language-zsh highlighter-rouge"><div class="highlight"><pre class="highlight"><code><span class="c"># ~/.zshrc</span>
<span class="nb">source</span> ~/.uz/uz.zsh
</code></pre></div></div>

<h2 id="usage">Usage</h2>

<p>Add plugins with <code class="language-plaintext highlighter-rouge">zadd</code>. They’re cloned automatically on first load.</p>

<div class="language-zsh highlighter-rouge"><div class="highlight"><pre class="highlight"><code>zadd zsh-users/zsh-syntax-highlighting
zadd zsh-users/zsh-completions
zadd zsh-users/zsh-history-substring-search
</code></pre></div></div>

<p>By default, uz sources <code class="language-plaintext highlighter-rouge">init.zsh</code> or <code class="language-plaintext highlighter-rouge">plugin_name.(zsh|plugin.zsh|zsh-theme|sh)</code>.
For plugins with non-standard entry points:</p>

<div class="language-zsh highlighter-rouge"><div class="highlight"><pre class="highlight"><code>zadd username/repo custom-script.zsh
</code></pre></div></div>

<h3 id="managing-plugins">Managing Plugins</h3>

<p>Update all installed plugins:</p>

<div class="language-sh highlighter-rouge"><div class="highlight"><pre class="highlight"><code>zupdate
</code></pre></div></div>

<p>Remove plugins no longer in your <code class="language-plaintext highlighter-rouge">.zshrc</code>:</p>

<div class="language-sh highlighter-rouge"><div class="highlight"><pre class="highlight"><code>zclean
</code></pre></div></div>

<h2 id="how-it-works">How It Works</h2>

<p>The entire plugin manager is a single function
that checks if a directory exists,
clones it if not,
and sources the right file.</p>

<div class="language-zsh highlighter-rouge"><div class="highlight"><pre class="highlight"><code>zadd<span class="o">()</span> <span class="o">{</span>
  <span class="nb">local </span><span class="nv">zmodule</span><span class="o">=</span><span class="k">${</span><span class="nv">1</span>:t<span class="k">}</span> <span class="nv">zurl</span><span class="o">=</span><span class="k">${</span><span class="nv">1</span><span class="k">}</span> <span class="nv">zscript</span><span class="o">=</span><span class="k">${</span><span class="nv">2</span><span class="k">}</span>
  <span class="nb">local </span><span class="nv">zpath</span><span class="o">=</span><span class="k">${</span><span class="nv">UZ_PLUGIN_PATH</span><span class="k">}</span>/<span class="k">${</span><span class="nv">zmodule</span><span class="k">}</span>

  <span class="k">if</span> <span class="o">[[</span> <span class="o">!</span> <span class="nt">-d</span> <span class="k">${</span><span class="nv">zpath</span><span class="k">}</span> <span class="o">]]</span><span class="p">;</span> <span class="k">then
    </span><span class="nb">mkdir</span> <span class="nt">-p</span> <span class="k">${</span><span class="nv">zpath</span><span class="k">}</span>
    git clone <span class="nt">--recursive</span> https://github.com/<span class="k">${</span><span class="nv">zurl</span><span class="k">}</span>.git <span class="k">${</span><span class="nv">zpath</span><span class="k">}</span>
  <span class="k">fi

  </span><span class="nb">local </span><span class="nv">zscripts</span><span class="o">=(</span><span class="k">${</span><span class="nv">zpath</span><span class="k">}</span>/<span class="o">(</span>init.zsh|<span class="k">${</span><span class="nv">zmodule</span>:t<span class="k">}</span>.<span class="o">(</span>zsh|plugin.zsh|zsh-theme|sh<span class="o">))(</span>NOL[1]<span class="o">))</span>
  <span class="k">if</span>   <span class="o">[[</span> <span class="nt">-f</span> <span class="k">${</span><span class="nv">zpath</span><span class="k">}</span>/<span class="k">${</span><span class="nv">zscript</span><span class="k">}</span> <span class="o">]]</span><span class="p">;</span> <span class="k">then </span><span class="nb">source</span> <span class="k">${</span><span class="nv">zpath</span><span class="k">}</span>/<span class="k">${</span><span class="nv">zscript</span><span class="k">}</span>
  <span class="k">elif</span> <span class="o">[[</span> <span class="nt">-f</span> <span class="k">${</span><span class="nv">zscripts</span><span class="k">}</span> <span class="o">]]</span><span class="p">;</span> <span class="k">then </span><span class="nb">source</span> <span class="k">${</span><span class="nv">zscripts</span><span class="k">}</span>
  <span class="k">fi</span>
<span class="o">}</span>
</code></pre></div></div>

<p>Plugins install to <code class="language-plaintext highlighter-rouge">~/.uz/plugins</code> by default.
Override with <code class="language-plaintext highlighter-rouge">UZ_PLUGIN_PATH</code> if needed.</p>

<h2 id="uninstall">Uninstall</h2>

<p>Everything is self-contained.
Remove the installation directory:</p>

<div class="language-sh highlighter-rouge"><div class="highlight"><pre class="highlight"><code><span class="nb">rm</span> <span class="nt">-rf</span> ~/.uz
</code></pre></div></div>]]></content><author><name>Max Rodrigo</name><email>hi@maxrodrigo.com</email></author><category term="howto" /><category term="zsh" /><category term="shell" /><summary type="html"><![CDATA[Manage zsh plugins with a minimal, single-file plugin manager that handles installation, updates, and cleanup in under 40 lines of code.]]></summary></entry><entry><title type="html">NordVPN Status in Tmux</title><link href="https://www.maxrodrigo.com/blog/monitor-nordvpn-status-in-tmux" rel="alternate" type="text/html" title="NordVPN Status in Tmux" /><published>2019-12-03T00:00:00+00:00</published><updated>2019-12-03T00:00:00+00:00</updated><id>https://www.maxrodrigo.com/blog/monitor-nordvpn-status-in-tmux</id><content type="html" xml:base="https://www.maxrodrigo.com/blog/monitor-nordvpn-status-in-tmux"><![CDATA[<p>When using a VPN
it’s easy to lose track of whether you’re connected or which server you’re on.</p>

<p><a href="https://github.com/maxrodrigo/tmux-nordvpn">tmux-nordvpn</a> displays NordVPN connection information directly in the tmux status bar.</p>

<h2 id="installation">Installation</h2>

<h3 id="using-tpm">Using TPM</h3>

<div class="language-sh highlighter-rouge"><div class="highlight"><pre class="highlight"><code><span class="nb">set</span> <span class="nt">-g</span> @plugin <span class="s1">'maxrodrigo/tmux-nordvpn'</span>
</code></pre></div></div>

<p>Press <code class="language-plaintext highlighter-rouge">prefix + I</code> to install.</p>

<h3 id="manual">Manual</h3>

<div class="language-sh highlighter-rouge"><div class="highlight"><pre class="highlight"><code>git clone https://github.com/maxrodrigo/tmux-nordvpn ~/.tmux/tmux-nordvpn
</code></pre></div></div>

<div class="language-sh highlighter-rouge"><div class="highlight"><pre class="highlight"><code><span class="c"># .tmux.conf</span>
run-shell ~/.tmux/tmux-nordvpn/nordvpn.tmux
</code></pre></div></div>

<p>Reload with <code class="language-plaintext highlighter-rouge">tmux source-file ~/.tmux.conf</code>.</p>

<h2 id="usage">Usage</h2>

<p>Add format strings to your status line:</p>

<div class="language-sh highlighter-rouge"><div class="highlight"><pre class="highlight"><code><span class="nb">set</span> <span class="nt">-g</span> status-right <span class="s1">'VPN: #{nordvpn_status_color}#{nordvpn_status} (#{nordvpn_country})'</span>
</code></pre></div></div>

<h3 id="format-strings">Format Strings</h3>

<table>
  <thead>
    <tr>
      <th>Format</th>
      <th>Description</th>
    </tr>
  </thead>
  <tbody>
    <tr>
      <td><code class="language-plaintext highlighter-rouge">#{nordvpn_status}</code></td>
      <td>Connection status</td>
    </tr>
    <tr>
      <td><code class="language-plaintext highlighter-rouge">#{nordvpn_server}</code></td>
      <td>Current server</td>
    </tr>
    <tr>
      <td><code class="language-plaintext highlighter-rouge">#{nordvpn_country}</code></td>
      <td>Connection country</td>
    </tr>
    <tr>
      <td><code class="language-plaintext highlighter-rouge">#{nordvpn_city}</code></td>
      <td>Connection city</td>
    </tr>
    <tr>
      <td><code class="language-plaintext highlighter-rouge">#{nordvpn_ip}</code></td>
      <td>Connection IP address</td>
    </tr>
    <tr>
      <td><code class="language-plaintext highlighter-rouge">#{nordvpn_status_color}</code></td>
      <td>Dynamic color based on status</td>
    </tr>
  </tbody>
</table>

<h3 id="customization">Customization</h3>

<div class="language-sh highlighter-rouge"><div class="highlight"><pre class="highlight"><code><span class="nb">set</span> <span class="nt">-g</span> @nordvpn_connected_text <span class="s2">"c"</span>
<span class="nb">set</span> <span class="nt">-g</span> @nordvpn_connecting_text <span class="s2">"…"</span>
<span class="nb">set</span> <span class="nt">-g</span> @nordvpn_disconnected_text <span class="s2">"d"</span>

<span class="nb">set</span> <span class="nt">-g</span> @nordvpn_connected_fg_color <span class="s2">"green"</span>
<span class="nb">set</span> <span class="nt">-g</span> @nordvpn_connecting_fg_color <span class="s2">"yellow"</span>
<span class="nb">set</span> <span class="nt">-g</span> @nordvpn_disconnected_fg_color <span class="s2">"red"</span>
</code></pre></div></div>

<h2 id="update-interval">Update Interval</h2>

<p>The plugin refreshes according to <code class="language-plaintext highlighter-rouge">status-interval</code>.
Lower values mean faster updates:</p>

<div class="language-sh highlighter-rouge"><div class="highlight"><pre class="highlight"><code><span class="nb">set</span> <span class="nt">-g</span> status-interval 5
</code></pre></div></div>

<h2 id="requirements">Requirements</h2>

<p>Requires the <a href="https://support.nordvpn.com/FAQ/Setup-tutorials/">NordVPN CLI</a> to be installed.</p>]]></content><author><name>Max Rodrigo</name><email>hi@maxrodrigo.com</email></author><category term="howto" /><category term="tmux" /><category term="shell" /><summary type="html"><![CDATA[Display NordVPN connection status, server, country, and IP address in your tmux status bar.]]></summary></entry><entry><title type="html">Install Puppeteer and Chrome on Amazon Linux</title><link href="https://www.maxrodrigo.com/blog/install-puppeteer-and-chrome-on-amazon-linux" rel="alternate" type="text/html" title="Install Puppeteer and Chrome on Amazon Linux" /><published>2018-10-19T00:00:00+00:00</published><updated>2018-10-19T00:00:00+00:00</updated><id>https://www.maxrodrigo.com/blog/install-puppeteer-and-chrome-on-amazon-linux</id><content type="html" xml:base="https://www.maxrodrigo.com/blog/install-puppeteer-and-chrome-on-amazon-linux"><![CDATA[<p>When automating frontend testing or prerendering on AWS,
Chrome and Puppeteer require several native dependencies that aren’t available by default on Amazon Linux.
Here’s a provisioning script to install Puppeteer, Chrome, and its dependencies on an AWS EC2 Amazon Linux AMI.</p>

<blockquote>
  <p><strong>Note:</strong> This script targets Node.js 8 and the Amazon Linux AMI available in 2018. Package versions and repository URLs may need updating for newer environments.</p>
</blockquote>

<div class="language-sh highlighter-rouge"><div class="highlight"><pre class="highlight"><code><span class="c">#!/bin/env bash</span>

<span class="c"># Install 3rd party repositories</span>
<span class="nb">sudo </span>rpm <span class="nt">-ivh</span> <span class="nt">--nodeps</span> http://mirror.centos.org/centos/7/os/x86_64/Packages/atk-2.22.0-3.el7.x86_64.rpm
<span class="nb">sudo </span>rpm <span class="nt">-ivh</span> <span class="nt">--nodeps</span> http://mirror.centos.org/centos/7/os/x86_64/Packages/at-spi2-atk-2.22.0-2.el7.x86_64.rpm
<span class="nb">sudo </span>rpm <span class="nt">-ivh</span> <span class="nt">--nodeps</span> http://mirror.centos.org/centos/7/os/x86_64/Packages/at-spi2-core-2.22.0-1.el7.x86_64.rpm

<span class="c"># Install dependencies</span>
<span class="nb">sudo </span>yum <span class="nb">install</span> <span class="nt">-y</span> nodejs gcc-c++ make cups-libs dbus-glib libXrandr libXcursor libXinerama cairo cairo-gobject pango libXScrnSaver gtk3

<span class="c"># On Amazon Linux 2 Downgrade ALSA library</span>
<span class="nb">sudo </span>yum remove alsa-lib-1.1.4.1-2.amzn2.i686
<span class="nb">sudo </span>yum <span class="nb">install </span>alsa-lib-1.1.3-3.amzn2.x86_64

<span class="c"># Remove old versions of node and npm</span>
<span class="nb">sudo </span>yum remove <span class="nt">-y</span> nodejs npm

<span class="c"># Install yarn</span>
<span class="nb">sudo </span>yum <span class="nb">install</span> <span class="nt">-y</span> yarn

curl <span class="nt">-sL</span> https://dl.yarnpkg.com/rpm/yarn.repo | <span class="nb">sudo tee</span> /etc/yum.repos.d/yarn.repo
curl <span class="nt">-sL</span> https://rpm.nodesource.com/setup_8.x | <span class="nb">sudo </span>bash -

<span class="nb">mkdir </span>puppeteer
<span class="nb">cd </span>puppeteer
npm <span class="nb">install </span>puppeteer

<span class="nb">cd</span> .local-chromium/linux<span class="k">*</span>/chrome-linux
</code></pre></div></div>

<p>Missing dependencies can be found by filtering Chrome’s shared libraries:</p>

<div class="language-sh highlighter-rouge"><div class="highlight"><pre class="highlight"><code>ldd chrome | <span class="nb">grep </span>not
</code></pre></div></div>
<p>Comment, review or star at: <a href="https://gist.github.com/maxrodrigo/9d91e48c19244ead6ef5b466957be0ab">https://gist.github.com/maxrodrigo/9d91e48c19244ead6ef5b466957be0ab</a></p>]]></content><author><name>Max Rodrigo</name><email>hi@maxrodrigo.com</email></author><category term="howto" /><category term="javascript" /><category term="aws" /><category term="node" /><summary type="html"><![CDATA[Provisioning script to install Puppeteer, Chromium, and all required native dependencies on an AWS EC2 Amazon Linux AMI.]]></summary></entry><entry><title type="html">Python HTTPS Simple Server</title><link href="https://www.maxrodrigo.com/blog/python-https-simple-server" rel="alternate" type="text/html" title="Python HTTPS Simple Server" /><published>2016-06-06T00:00:00+00:00</published><updated>2016-06-06T00:00:00+00:00</updated><id>https://www.maxrodrigo.com/blog/python-https-simple-server</id><content type="html" xml:base="https://www.maxrodrigo.com/blog/python-https-simple-server"><![CDATA[<p>When you need to quickly share files or test a web app,
Python has a built-in answer, nothing extra to install.
Many times Netcat<sup id="fnref:netcat" role="doc-noteref"><a href="#fn:netcat" class="footnote" rel="footnote">1</a></sup> is enough for a single-use transfer,
but when sharing multiple files or even a website,
a proper HTTP server is more practical.</p>

<p>Python’s <a href="https://docs.python.org/3/library/http.server.html">HTTPServer</a>,
or <a href="https://docs.python.org/2/library/simplehttpserver.html">SimpleHTTPServer</a> in Python 2,
is a quick way to start a local HTTP server on your network.</p>

<hr />
<p><strong>NOTES</strong></p>

<p><code class="language-plaintext highlighter-rouge">http.server</code> is not recommended for production.
It only implements basic security checks.</p>

<p><code class="language-plaintext highlighter-rouge">ssl.wrap_socket</code> was deprecated in Python 3.7 and removed in Python 3.12.
The Python 3 example below wraps the socket through an <code class="language-plaintext highlighter-rouge">ssl.SSLContext</code> instead.
The Python 2 examples still call the removed function,
so they will not run on a current interpreter.</p>

<p>Python 2 is <a href="https://pythonclock.org/">deprecated</a> and should be avoided if possible.
Yet <a href="#python-2">Python 2 Examples</a> are still available below for legacy reference.</p>

<hr />

<h2 id="http-web-server">HTTP Web Server</h2>

<p>The module can be easily invoked,
from the directory we want to share,
using the <code class="language-plaintext highlighter-rouge">-m</code> switch of the interpreter.</p>

<div class="language-sh highlighter-rouge"><div class="highlight"><pre class="highlight"><code>python3 <span class="nt">-m</span> http.server 8000
</code></pre></div></div>

<p>Or imported as a module, for additional configuration.</p>

<div class="language-python highlighter-rouge"><div class="highlight"><pre class="highlight"><code><span class="c1">#!/usr/bin/env python
# -*- coding: utf-8 -*-
</span>
<span class="kn">import</span> <span class="nn">http.server</span>
<span class="kn">import</span> <span class="nn">socketserver</span>

<span class="n">PORT</span> <span class="o">=</span> <span class="mi">8000</span>

<span class="n">Handler</span> <span class="o">=</span> <span class="n">http</span><span class="p">.</span><span class="n">server</span><span class="p">.</span><span class="n">SimpleHTTPRequestHandler</span>

<span class="k">with</span> <span class="n">socketserver</span><span class="p">.</span><span class="n">TCPServer</span><span class="p">((</span><span class="s">""</span><span class="p">,</span> <span class="n">PORT</span><span class="p">),</span> <span class="n">Handler</span><span class="p">)</span> <span class="k">as</span> <span class="n">httpd</span><span class="p">:</span>
  <span class="k">print</span><span class="p">(</span><span class="s">"serving at port"</span><span class="p">,</span> <span class="n">PORT</span><span class="p">)</span>
  <span class="n">httpd</span><span class="p">.</span><span class="n">serve_forever</span><span class="p">()</span>
</code></pre></div></div>

<h2 id="http-web-server-with-ssl-support">HTTP Web Server with SSL Support</h2>

<h3 id="self-signed-certificates">Self-signed certificates</h3>

<p>If you are going to create a server that provides SSL-encrypted connection services,
you will need a certificate.
Besides buying a certificate from a certification authority,
another common practice is to generate a self-signed certificate.
The simplest way to do this is with the <a href="https://www.openssl.org/docs/">OpenSSL</a> tool,
using something like the following:</p>

<div class="language-sh highlighter-rouge"><div class="highlight"><pre class="highlight"><code>openssl req <span class="nt">-new</span> <span class="nt">-x509</span> <span class="nt">-days</span> 365 <span class="nt">-nodes</span> <span class="nt">-out</span> cert.pem <span class="nt">-keyout</span> cert.pem
</code></pre></div></div>

<h3 id="https-server">HTTPS Server</h3>

<div class="language-python highlighter-rouge"><div class="highlight"><pre class="highlight"><code><span class="c1">#!/usr/bin/env python
# -*- coding: utf-8 -*-
</span>
<span class="kn">from</span> <span class="nn">http.server</span> <span class="kn">import</span> <span class="n">HTTPServer</span>
<span class="kn">from</span> <span class="nn">http.server</span> <span class="kn">import</span> <span class="n">SimpleHTTPRequestHandler</span>
<span class="kn">import</span> <span class="nn">ssl</span>

<span class="n">server_address</span> <span class="o">=</span> <span class="p">(</span><span class="s">"localhost"</span><span class="p">,</span> <span class="mi">4443</span><span class="p">)</span>
<span class="n">httpd</span> <span class="o">=</span> <span class="n">HTTPServer</span><span class="p">(</span><span class="n">server_address</span><span class="p">,</span> <span class="n">SimpleHTTPRequestHandler</span><span class="p">)</span>

<span class="n">context</span> <span class="o">=</span> <span class="n">ssl</span><span class="p">.</span><span class="n">SSLContext</span><span class="p">(</span><span class="n">ssl</span><span class="p">.</span><span class="n">PROTOCOL_TLS_SERVER</span><span class="p">)</span>
<span class="n">context</span><span class="p">.</span><span class="n">load_cert_chain</span><span class="p">(</span><span class="n">certfile</span><span class="o">=</span><span class="s">"cert.pem"</span><span class="p">)</span>

<span class="n">httpd</span><span class="p">.</span><span class="n">socket</span> <span class="o">=</span> <span class="n">context</span><span class="p">.</span><span class="n">wrap_socket</span><span class="p">(</span><span class="n">httpd</span><span class="p">.</span><span class="n">socket</span><span class="p">,</span> <span class="n">server_side</span><span class="o">=</span><span class="bp">True</span><span class="p">)</span>
<span class="n">httpd</span><span class="p">.</span><span class="n">serve_forever</span><span class="p">()</span>
</code></pre></div></div>

<p><code class="language-plaintext highlighter-rouge">load_cert_chain</code> reads the private key from the certificate file
when no <code class="language-plaintext highlighter-rouge">keyfile</code> is given,
which is why the <code class="language-plaintext highlighter-rouge">openssl</code> command above writes both into <code class="language-plaintext highlighter-rouge">cert.pem</code>.</p>

<hr />

<h2 id="python-2-legacy">Python 2 (Legacy)</h2>

<blockquote>
  <p>Python 2 reached end-of-life in January 2020. The examples below are kept for reference only.</p>
</blockquote>

<h3 id="interpreter-module-invocation">Interpreter Module Invocation</h3>

<div class="language-sh highlighter-rouge"><div class="highlight"><pre class="highlight"><code>python <span class="nt">-m</span> SimpleHTTPServer 8000
</code></pre></div></div>

<h3 id="imported-module---http-server">Imported Module - HTTP Server</h3>

<div class="language-python highlighter-rouge"><div class="highlight"><pre class="highlight"><code><span class="c1">#!/usr/bin/env python
# -*- coding: utf-8 -*-
</span>
<span class="kn">import</span> <span class="nn">SimpleHTTPServer</span>
<span class="kn">import</span> <span class="nn">SocketServer</span>

<span class="n">PORT</span> <span class="o">=</span> <span class="mi">8000</span>

<span class="n">Handler</span> <span class="o">=</span> <span class="n">SimpleHTTPServer</span><span class="p">.</span><span class="n">SimpleHTTPRequestHandler</span>

<span class="n">httpd</span> <span class="o">=</span> <span class="n">SocketServer</span><span class="p">.</span><span class="n">TCPServer</span><span class="p">((</span><span class="s">""</span><span class="p">,</span> <span class="n">PORT</span><span class="p">),</span> <span class="n">Handler</span><span class="p">)</span>

<span class="k">print</span> <span class="s">"serving at port"</span><span class="p">,</span> <span class="n">PORT</span>
<span class="n">httpd</span><span class="p">.</span><span class="n">serve_forever</span><span class="p">()</span>
</code></pre></div></div>

<h3 id="imported-module---https-server">Imported Module - HTTPS Server</h3>

<div class="language-python highlighter-rouge"><div class="highlight"><pre class="highlight"><code><span class="c1">#!/usr/bin/env python
# -*- coding: utf-8 -*-
</span>
<span class="kn">import</span> <span class="nn">BaseHTTPServer</span>
<span class="kn">import</span> <span class="nn">SimpleHTTPServer</span>
<span class="kn">import</span> <span class="nn">ssl</span>

<span class="n">httpd</span> <span class="o">=</span> <span class="n">BaseHTTPServer</span><span class="p">.</span><span class="n">HTTPServer</span><span class="p">((</span><span class="s">"localhost"</span><span class="p">,</span> <span class="mi">4443</span><span class="p">),</span>
                                  <span class="n">SimpleHTTPServer</span><span class="p">.</span><span class="n">SimpleHTTPRequestHandler</span><span class="p">)</span>
<span class="n">httpd</span><span class="p">.</span><span class="n">socket</span> <span class="o">=</span> <span class="n">ssl</span><span class="p">.</span><span class="n">wrap_socket</span><span class="p">(</span><span class="n">httpd</span><span class="p">.</span><span class="n">socket</span><span class="p">,</span>
                               <span class="n">server_side</span><span class="o">=</span><span class="bp">True</span><span class="p">,</span>
                               <span class="n">certfile</span><span class="o">=</span><span class="s">"cert.pem"</span><span class="p">)</span>
<span class="n">httpd</span><span class="p">.</span><span class="n">serve_forever</span><span class="p">()</span>
</code></pre></div></div>

<div class="footnotes" role="doc-endnotes">
  <ol>
    <li id="fn:netcat" role="doc-endnote">

      <p>Netcat file transfer:</p>

      <p><code class="language-plaintext highlighter-rouge">nc -nlvp 9000 &gt; file</code></p>

      <p><code class="language-plaintext highlighter-rouge">nc &lt;listener ip&gt; 9000 &lt; file</code> <a href="#fnref:netcat" class="reversefootnote" role="doc-backlink">&#8617;</a></p>
    </li>
  </ol>
</div>]]></content><author><name>Max Rodrigo</name><email>hi@maxrodrigo.com</email></author><category term="howto" /><category term="python" /><category term="networking" /><summary type="html"><![CDATA[Quickly serve files over HTTP or HTTPS using Python 3's built-in http.server module and a self-signed OpenSSL certificate.]]></summary></entry><entry><title type="html">Survival Guide to IRC Identification</title><link href="https://www.maxrodrigo.com/blog/survival-guide-to-irc-identification" rel="alternate" type="text/html" title="Survival Guide to IRC Identification" /><published>2015-09-11T00:00:00+00:00</published><updated>2015-09-11T00:00:00+00:00</updated><id>https://www.maxrodrigo.com/blog/survival-guide-to-irc-identification</id><content type="html" xml:base="https://www.maxrodrigo.com/blog/survival-guide-to-irc-identification"><![CDATA[<blockquote>
  <p><strong>Note:</strong> Freenode shut down in 2021. The NickServ commands below are standard across most IRC networks (Libera.Chat, OFTC, etc.), but Freenode-specific links and policies are no longer active.</p>
</blockquote>

<p>NickServ is the utility used for registration and protection of nicknames.
It allows users to register a nickname and prevent others from using that name.</p>

<p>For a deeper understanding of the service, I recommend using the online HELP.</p>

<div class="language-plaintext highlighter-rouge"><div class="highlight"><pre class="highlight"><code>/msg NickServ help [&lt;command&gt;]
</code></pre></div></div>

<p><strong>Important Note:</strong> On most networks,
if a registered nickname is not logged in for 30 days,
NickServ will drop the account,
making it available again.
The exact policy varies by network.</p>

<h2 id="register-a-nickname">Register a nickname</h2>

<div class="language-plaintext highlighter-rouge"><div class="highlight"><pre class="highlight"><code>/msg NickServ REGISTER &lt;password&gt; &lt;email-address&gt;
</code></pre></div></div>

<p>Most servers require a valid email address that they will e-mail with a verification code.</p>

<h2 id="log-in-to-the-network">Log in to the network</h2>

<p>Next time you log into the network,
you will be prompted for your account password.
Identify with the server.</p>

<div class="language-plaintext highlighter-rouge"><div class="highlight"><pre class="highlight"><code>/msg NickServ IDENTIFY &lt;password&gt;
</code></pre></div></div>

<h2 id="update-your-information">Update your information</h2>

<p>Update the email address.</p>

<div class="language-plaintext highlighter-rouge"><div class="highlight"><pre class="highlight"><code>/msg NickServ SET email &lt;new-email-address&gt;
</code></pre></div></div>

<p>Update the password.</p>

<div class="language-plaintext highlighter-rouge"><div class="highlight"><pre class="highlight"><code>/msg NickServ SET password &lt;new-password&gt;
</code></pre></div></div>

<p>Update the account nickname.
It should be any nickname registered to your account.</p>

<div class="language-plaintext highlighter-rouge"><div class="highlight"><pre class="highlight"><code>/msg NickServ SET accountname &lt;nickname&gt;
</code></pre></div></div>

<h2 id="password-recovery">Password Recovery</h2>

<p>If you forget your NickServ password and need a reminder.</p>

<div class="language-plaintext highlighter-rouge"><div class="highlight"><pre class="highlight"><code>/msg NickServ sendpass &lt;nickname&gt;
</code></pre></div></div>

<h2 id="enforce-blocked-and-release">Enforce, Blocked and Release</h2>

<div class="language-plaintext highlighter-rouge"><div class="highlight"><pre class="highlight"><code>/msg NickServ SET ENFORCE &lt;ON|OFF&gt;
</code></pre></div></div>

<p>When <code class="language-plaintext highlighter-rouge">ENFORCE ON</code>,
NickServ will automatically protect any nickname registered to your account
by forcibly switching the nick of anyone who attempts to use them without identifying after thirty seconds.
After a nickname enforcement has happened,
the nickname is temporarily blocked.</p>

<p>If you attempt to identify to NickServ more than N amount of times,
your nickname will be also temporarily blocked.
The services program does this by logging a bot onto the network under your nickname as an extra security precaution.</p>

<p>Whether your nickname was enforced or blocked,
the RELEASE command unblocks it for use again.</p>

<div class="language-plaintext highlighter-rouge"><div class="highlight"><pre class="highlight"><code>/msg NickServ RELEASE &lt;nickname&gt; &lt;password&gt;
</code></pre></div></div>

<h2 id="ghosts">Ghosts</h2>

<p>A “ghost” session is one which is not connected,
but which the IRC server believes is still online.
Typically, this happens if your client crashes or your Internet connection goes down while you’re on IRC.
You can easily disconnect the ghost without any administration help.</p>

<div class="language-plaintext highlighter-rouge"><div class="highlight"><pre class="highlight"><code>/msg NickServ GHOST &lt;nickname&gt; &lt;password&gt;
</code></pre></div></div>

<h2 id="freenode-cloak-historical">Freenode Cloak (Historical)</h2>

<p>If you’re identified to NickServ
it is possible to replace the <code class="language-plaintext highlighter-rouge">hostname/IP</code> displayed when you are connected.</p>

<p><strong>Note:</strong> Cloaks can help obscure your IP address/hostname,
but should not be relied upon for that purpose,
as they are not reliable.</p>

<p>You can ask for an unaffiliated cloak in the network’s help channel.
This normally shows <code class="language-plaintext highlighter-rouge">unaffiliated/&lt;nickname&gt;</code>.
To obtain one,
you need to find the group contact for the group you are interested in,
and ask them to arrange the cloak for you.</p>

<p>For stronger privacy, consider connecting with Tor and SASL.</p>]]></content><author><name>Max Rodrigo</name><email>hi@maxrodrigo.com</email></author><category term="howto" /><category term="networking" /><category term="irc" /><summary type="html"><![CDATA[NickServ reference for registering and protecting IRC nicknames, logging in, recovering passwords, enforcing nicks, handling ghosts, and requesting Freenode cloaks.]]></summary></entry><entry xml:lang="es"><title type="html">Instalación y configuración de TinyDNS</title><link href="https://www.maxrodrigo.com/blog/instalacion-y-configuracion-tinydns" rel="alternate" type="text/html" title="Instalación y configuración de TinyDNS" /><published>2007-10-14T00:00:00+00:00</published><updated>2007-10-14T00:00:00+00:00</updated><id>https://www.maxrodrigo.com/blog/instalacion-y-configuracion-tinydns</id><content type="html" xml:base="https://www.maxrodrigo.com/blog/instalacion-y-configuracion-tinydns"><![CDATA[<p>TinyDNS es el servidor de nombres de <a href="http://cr.yp.to/djbdns.html">djbDNS</a>,
una suite de herramientas para DNS,
creada por <a href="http://cr.yp.to/djb.html">Daniel J. Bernstein</a>.
Por defecto el servidor solo responde a consultas de las zonas previamente declaradas,
no responde consultas inversas ni transferencia de zonas.
Para estas otras funcionalidades otra serie de herramientas están disponibles dentro de la suite.
Esta modularidad lo hace muy potente, versátil y rápido.</p>

<p>djbDNS se compone de 6 herramientas:</p>

<ul>
  <li>TinyDNS: Servidor de Nombres.</li>
  <li>DNScache: Almacena y resuelve direcciones, como aquellas que TinyDNS no tiene declaradas.</li>
  <li>WallDNS: Resuelve consultas inversas.</li>
  <li>RblDNS: Provee información sobre direcciones IP.</li>
  <li>AxfrDNS: Responde consultas de transferencia de zona.</li>
  <li>Axfr-get: Realiza las transferencias de zona.</li>
</ul>

<p>djbDNS tiene 2 dependencias,
daemontools 0.70+ y ucspi-tcp que debemos instalar antes de continuar.</p>

<h2 id="setup">Setup</h2>

<p>Creamos un directorio para almacenar nuestras descargas.</p>

<div class="language-sh highlighter-rouge"><div class="highlight"><pre class="highlight"><code><span class="nb">mkdir</span> /package
<span class="nb">chmod </span>755 /package
<span class="nb">cd</span> /package
</code></pre></div></div>

<h2 id="compilar-daemontools">Compilar Daemontools</h2>

<blockquote>
  <p>Daemontools es la colección de herramientas para el manejo de servicios en UNIX.</p>
</blockquote>

<p>Descargamos daemontools 0.76 y descomprimimos.</p>

<div class="language-sh highlighter-rouge"><div class="highlight"><pre class="highlight"><code>wget http://cr.yp.to/daemontools/daemontools-0.76.tar.gz
<span class="nb">tar </span>xvfz daemontools-0.76.tar.gz
</code></pre></div></div>

<h3 id="compilamos">Compilamos</h3>

<p>Si estamos trabajando en Linux y no en BSD o Solaris
es probable que al compilar recibamos el siguiente error:</p>

<p><code class="language-plaintext highlighter-rouge">/usr/bin/ld: errno: TLS definition in /lib64/libc.so.6 section .tbss mismatches non-TLS reference in envdir.o.</code></p>

<p>Editamos <code class="language-plaintext highlighter-rouge">/package/admin/daemontools-0.76/src/conf--cc</code>
e incluimos <code class="language-plaintext highlighter-rouge">-include /usr/include/errno.h</code> al final de la primera línea.</p>

<p>Debería quedarnos así:</p>

<p><code class="language-plaintext highlighter-rouge">gcc -O2 -Wimplicit -Wunused -Wcomment -Wchar-subscripts -Wuninitialized -Wshadow -Wcast-qual -Wcast-align -Wwrite-strings -include /usr/include/errno.h</code></p>

<div class="language-sh highlighter-rouge"><div class="highlight"><pre class="highlight"><code><span class="nb">cd </span>admin/daemontools-0.76/
package/install
</code></pre></div></div>

<p>Por defecto la instalación carga <code class="language-plaintext highlighter-rouge">svscan</code> a la rutina de inicio
y agrega <code class="language-plaintext highlighter-rouge">SV:12345:respawn:/command/svscanboot</code> a <code class="language-plaintext highlighter-rouge">/etc/inittab</code>.
Ejecutemos <code class="language-plaintext highlighter-rouge">svscan</code>.</p>

<div class="language-sh highlighter-rouge"><div class="highlight"><pre class="highlight"><code>svscan /service &amp;
</code></pre></div></div>

<h2 id="instalación-de-ucspi-tcp">Instalación de ucspi-tcp</h2>

<blockquote>
  <p><a href="http://cr.yp.to/ucspi-tcp.html">ucspi-tcp</a> (UNIX Client-Server Program Interface for TCP) es una herramienta de línea de comandos para crear aplicaciones TCP de cliente-servidor.</p>
</blockquote>

<p>Descargamos ucspi-tcp 0.88 y descomprimimos.</p>

<div class="language-sh highlighter-rouge"><div class="highlight"><pre class="highlight"><code><span class="nb">cd</span> /package
wget http://cr.yp.to/ucspi-tcp/ucspi-tcp-0.88.tar.gz
<span class="nb">tar </span>xvzf ucspi-tcp-0.88.tar.gz
</code></pre></div></div>

<h3 id="compilamos-1">Compilamos</h3>

<p>Al igual que daemontools es probable que al compilar recibas un error de <code class="language-plaintext highlighter-rouge">libc.so</code>.
Editamos <code class="language-plaintext highlighter-rouge">/package/ucspi-tcp-0.88/conf-cc</code>
y al final de la primera línea agregamos <code class="language-plaintext highlighter-rouge">-include /usr/include/errno.h</code>.</p>

<p>Debería quedarnos así:</p>

<p><code class="language-plaintext highlighter-rouge">gcc -O2 -include /usr/include/errno.h</code></p>

<div class="language-sh highlighter-rouge"><div class="highlight"><pre class="highlight"><code><span class="nb">cd </span>ucspi-tcp-0.88/
make
make setup check
</code></pre></div></div>

<h2 id="instalación-de-djbdns-y-tinydns">Instalación de djbDNS y TinyDNS</h2>

<p>Descargamos y descomprimimos djbDNS.</p>

<div class="language-sh highlighter-rouge"><div class="highlight"><pre class="highlight"><code><span class="nb">cd</span> /package
wget http://cr.yp.to/djbdns/djbdns-1.05.tar.gz
<span class="nb">tar </span>xvzf djbdns-1.05.tar.gz
<span class="nb">cd </span>djbdns-1.05/
</code></pre></div></div>

<h3 id="compilamos-2">Compilamos</h3>

<div class="language-sh highlighter-rouge"><div class="highlight"><pre class="highlight"><code><span class="nb">echo </span>gcc <span class="nt">-O2</span> <span class="nt">-include</span> /usr/include/errno.h <span class="o">&gt;</span> conf-cc
make
make setup check
</code></pre></div></div>

<p>Ya con djbDNS y sus dependencias
creamos dos usuarios: <code class="language-plaintext highlighter-rouge">Gtinydns</code> y <code class="language-plaintext highlighter-rouge">Gdnslog</code>.</p>

<div class="language-sh highlighter-rouge"><div class="highlight"><pre class="highlight"><code>useradd Gtinydns
useradd Gdnslog
</code></pre></div></div>

<p>Ejecutamos <code class="language-plaintext highlighter-rouge">tinydns-conf</code> para crear la carpeta del servicio en <code class="language-plaintext highlighter-rouge">/etc/tinydns</code>.</p>

<blockquote>
  <p>Recuerda correr el comando con la IP pública de tu servidor.</p>
</blockquote>

<div class="language-sh highlighter-rouge"><div class="highlight"><pre class="highlight"><code>tinydns-conf Gtinydns Gdnslog /etc/tinydns &lt;public-ip&gt;
</code></pre></div></div>

<blockquote>
  <p>La IP debe estar configurada en el servidor y no debe utilizar DNScache ni algún otro servicio en el puerto 53.
Si se desea usar DNSCache en el mismo servidor se puede utilizar otra interfaz en el mismo servidor.</p>
</blockquote>

<p>Le notificamos a <code class="language-plaintext highlighter-rouge">svscan</code> del nuevo servicio
y usamos <code class="language-plaintext highlighter-rouge">svstat</code> para validar que el servicio esté corriendo.</p>

<div class="language-sh highlighter-rouge"><div class="highlight"><pre class="highlight"><code><span class="nb">ln</span> <span class="nt">-s</span> /etc/tinydns /service/tinydns
svstat /service/tinydns
</code></pre></div></div>

<p>Si reciben un error de <code class="language-plaintext highlighter-rouge">supervise</code>, comprueben que el proceso esté corriendo.</p>

<div class="language-sh highlighter-rouge"><div class="highlight"><pre class="highlight"><code>ps aux | <span class="nb">grep </span>sv
</code></pre></div></div>

<p>De no estarlo pueden ejecutarlo manualmente con <code class="language-plaintext highlighter-rouge">svscan /service &amp;</code></p>

<p>Re-ejecutar <code class="language-plaintext highlighter-rouge">svstat /service/tinydns</code> debería devolver el pid.</p>

<div class="language-sh highlighter-rouge"><div class="highlight"><pre class="highlight"><code>/service/tinydns: up <span class="o">(</span>pid <span class="c">####) ## seconds</span>
</code></pre></div></div>

<h2 id="delegación-y-zonas">Delegación y zonas</h2>

<p>Primero debemos configurar en nuestro proveedor de dominios (GoDaddy, Namecheap, etc.) nuestros dominios.
Registraremos un Nameserver con nuestra IP.
Una vez hecho esto,
debemos configurar nuestro servidor para que responda a nuestro dominio.
Recuerden usar nuestra IP.
Usaremos los comandos <code class="language-plaintext highlighter-rouge">add-host</code> y <code class="language-plaintext highlighter-rouge">add-alias</code> que se encuentran en el directorio <code class="language-plaintext highlighter-rouge">/etc/tinydns/root</code>.
Estos comandos editan el archivo <code class="language-plaintext highlighter-rouge">/etc/tinydns/root/data</code>.
Luego de editado este archivo debemos compilarlo con el comando <code class="language-plaintext highlighter-rouge">make</code>.</p>

<p>También podemos editar el archivo <code class="language-plaintext highlighter-rouge">data</code> manualmente.</p>

<p>Agreguemos nuestro NS al archivo data y compilemos.</p>

<div class="language-sh highlighter-rouge"><div class="highlight"><pre class="highlight"><code><span class="nb">cd</span> /etc/tinydns/root
./add-ns dominio.com 1.2.3.4
make
</code></pre></div></div>

<p>Si quisiéramos agregar un nuevo dominio, usamos <code class="language-plaintext highlighter-rouge">add-host</code>.</p>

<div class="language-sh highlighter-rouge"><div class="highlight"><pre class="highlight"><code>./add-host new-domain.com 1.2.3.4
</code></pre></div></div>

<p>Una alternativa es editar el archivo <code class="language-plaintext highlighter-rouge">data</code> manualmente
con la siguiente forma:</p>

<div class="language-sh highlighter-rouge"><div class="highlight"><pre class="highlight"><code><span class="sb">`</span><span class="o">=</span>tiger.heaven.af.mil:1.8.7.5<span class="sb">`</span> para add-host, o <span class="sb">`</span>+www.heaven.af.mil:1.8.7.4<span class="sb">`</span> para add-alias.
</code></pre></div></div>

<p>No olvides compilar el archivo data al finalizar la edición.</p>]]></content><author><name>Max Rodrigo</name><email>hi@maxrodrigo.com</email></author><category term="howto" /><category term="networking" /><category term="linux" /><category term="dns" /><summary type="html"><![CDATA[Guía para compilar e instalar djbDNS (TinyDNS, daemontools, ucspi-tcp) en Linux y configurar un servidor DNS autoritativo.]]></summary></entry></feed>